
Beginner’s Guide: Essential Safety Practices for Operating a Handheld Earth Auger
The handheld earth auger is a widely used tool in agricultural planting, landscaping maintenance, and construction projects. Powered by a gasoline engine and equipped with a spiral drill bit, it efficiently completes soil drilling tasks. However, due to its high-speed rotating components, strong vibrations, and fuel-driven mechanism, improper operation—especially by beginners—can easily lead to safety accidents.
This guide summarizes the four critical stages of auger operation: Pre-Operation, During Operation, Post-Operation, and Emergency Handling, helping beginners develop safe practices, standardize their actions, and minimize risks.
I. Pre-Operation: The “Three Checks and Two Preparations” Rule
Before starting the auger, beginners must strictly follow the “Check Equipment – Check Environment – Check Yourself” and “Prepare Safety Gear – Prepare Tools” procedures.
1. Comprehensive Equipment Check
- Power System: Ensure the fuel tank is filled with the correct grade of unleaded gasoline (92# or higher, per manual). Do not mix diesel or incompatible fuels. Confirm fuel cap seals are intact to prevent leakage and fire hazards.
- Transmission & Drill Bit: Inspect drill bit for deformation, cracks, or worn teeth. Damaged bits can cause excessive vibration or “bit jumping.” Ensure bolts are tight and belts (if present) have proper tension without cracks.
- Control System: Test handles for responsiveness. Ensure throttle and kill switch function properly. Check anti-vibration components to reduce strain on arms.
- Cables: Confirm no loose wires or cords are attached to the body to avoid entanglement or tripping hazards.
2. Environmental Assessment
- Site Clearance: Remove stones, branches, and metal debris to prevent the auger from jamming or flinging objects.
- Surroundings: Ensure no bystanders (especially children) are nearby. Maintain at least 3 meters from power lines or structures. Suspend operations in strong winds or heavy rain to avoid slips or accidents.
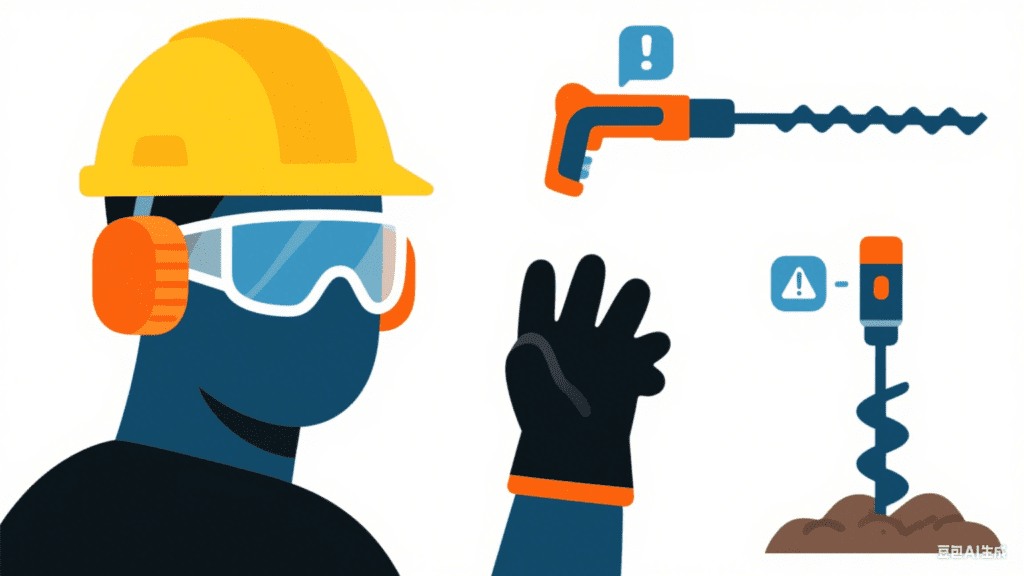
3. Self-Check & Safety Gear
- Physical Condition: Do not operate if fatigued, intoxicated, or under medication that impairs reaction.
- Protective Gear (Four Essentials):
- Helmet: National-standard helmet to prevent head injuries from falling debris.
- Goggles: Clear, wraparound goggles to block soil, dust, or flying particles.
- Earplugs: Gasoline augers often exceed 85 dB; wear ear protection to prevent hearing loss.
- Gloves: Anti-slip, wear-resistant gloves (canvas/rubber) to reduce vibration and ensure firm grip.
4. Preparing Tools
Keep a wrench (for tightening parts), fire extinguisher (gasoline-related fire risk), and first-aid kit (iodine, gauze, bandages) nearby.
II. During Operation: Follow the “Four Standards”
Beginners should adhere to four rules: Startup, Drilling Posture, Pressure Control, and Abnormal Handling.
1. Standard Startup
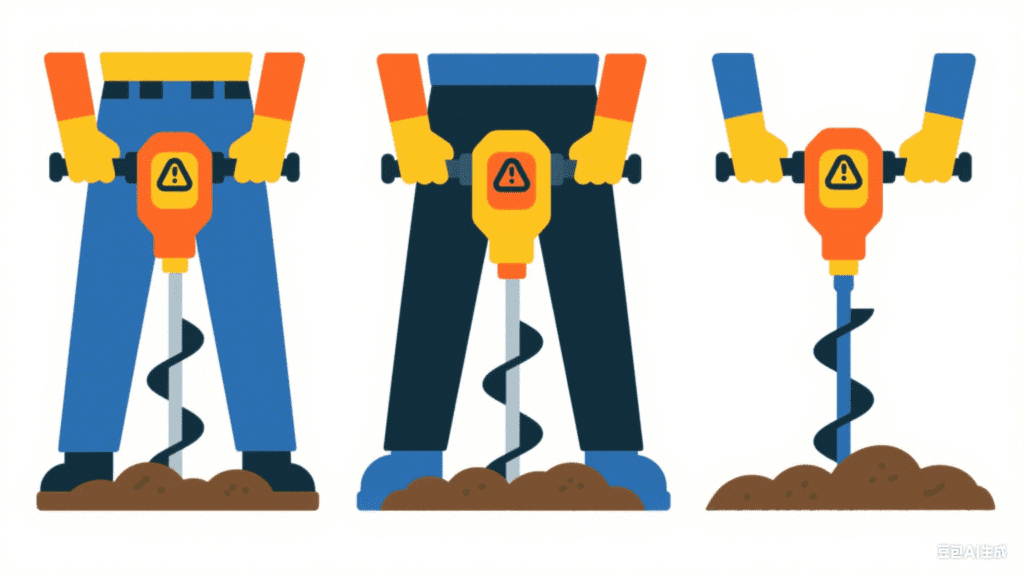
- Setup: Place the auger on flat ground with drill bit away from body. Grip both handles firmly, feet shoulder-width apart, lean slightly back to counter recoil.
- Correct Startup Steps: Set throttle to low, pull starter rope smoothly until resistance, then pull sharply. Let the engine idle for 1–2 minutes before drilling.
- Prohibited Startup: Never start while the bit touches the ground or debris. Do not use one hand or lean forward when starting.
2. Proper Drilling Posture
- Stance: Feet slightly wider than shoulders, knees bent for balance. Arms slightly bent, palms inward gripping handles.
- Bit Entry: Start with low throttle until drill bites into soil (1–2 cm). Then increase throttle gradually. Do not slam or force the bit downward.
- Safe Distance: Keep body at least 30 cm away from rotating drill. Only approach after complete engine shutdown.
3. Pressure & Direction Control
- Downward Pressure: Let the auger’s rotation pull itself downward. Excessive pressure overheats the engine and accelerates wear.
- Direction: Keep the auger vertical. If repositioning is needed, shut down engine first.
4. Abnormal Situations
- Bit Jamming: Shut off engine immediately. Do not force throttle. Loosen soil with a wrench or remove obstructions before resuming.
- Noise or Fuel Leak: Stop immediately. Check for loose bolts, damaged fuel lines, or abnormal sounds. Seek professional repair if unresolved.
III. Post-Operation: The “Three Cleanings and Two Checks”
After use, proper maintenance ensures long-term safety and performance.
1. Cleaning
- Drill Bit: Allow engine to cool for 10 minutes. Brush off soil and weeds. Wash if needed, but avoid water entering the engine.
- Machine Body: Wipe off dust and oil stains. Ensure ventilation ports are not blocked.
2. Inspection
- Parts: Recheck drill bit, belts, throttle, and bolts. Top up engine oil if low.
- Fuel: For downtime >1 week, drain fuel into a storage container. For short storage, keep tank half full and close valve.
3. Storage
Store in a dry, ventilated, fire-safe area. If possible, detach drill bit or wrap it to prevent accidents. Keep out of children’s reach.
IV. Emergency Response: “Two Priorities”
Even with proper precautions, emergencies may occur. Remember: People First, Fire Control First.
1. Treating Injuries
- Minor Cuts: Clean with water, disinfect with iodine, apply bandage. For deep cuts, seek hospital treatment.
- Impact Injuries: If vibration or collision causes swelling or pain, stop work and rest. Seek medical care if symptoms worsen.
2. Fire Safety
- If gasoline leakage causes fire, move away immediately. Use a prepared fire extinguisher (dry powder or CO₂). Do not use water, as it spreads gasoline fires. If uncontrollable, call emergency services (119) and evacuate.
Conclusion
For beginners, safe operation of a handheld auger is not something to learn later, but a foundation to master before starting work. From preparation and careful operation to proper post-use handling, every step must follow the principle of “Safety First.”
By internalizing these safety practices as habits, operators can both ensure personal safety and maximize the efficiency and durability of the handheld earth auger.